Fermented Green Beans

Fermented Green Beans (Crisp, Garlicky & Full of Probiotics)

If you’ve ever had a crunchy pickled green bean and wished it had that fresh, tangy ferment snap—this is it. Lacto-fermentation is the simplest way to preserve seasonal beans while building gut-friendly probiotics and big flavor, with just beans, salt, water, and time. No vinegar, no canning, no special equipment required.

Why ferment green beans?

  • Crunch! Beans stay snappy when you pack them whole and keep them under brine.

  • Clean ingredients. Just mineral-rich salt, clean water, and spices you choose.

  • Probiotic goodness. Raw, live culture—don’t heat-process after fermenting or you’ll lose the benefits.

  • Quick project. 10 minutes of prep, the jar does the rest.

What you’ll need

  • Fresh, firm green beans (ends trimmed)

  • Non-iodized salt (Redmond Real Salt / Diamond Crystal Kosher)

  • Filtered or dechlorinated water

  • Garlic, dill, mustard seeds, peppercorns, red pepper flakes (all optional but classic)

  • A 1-quart (1-liter) jar, weight, and lid (airlock or loose lid)

Flavor ideas

  • Classic Dilly: garlic, fresh dill, mustard seeds, and black peppercorns.

  • Spicy: add red pepper flakes or a slit jalapeño.

  • Lemon-Herb: lemon peel strips + thyme.

  • Pickling spice: mustard seed + coriander + bay.

How to keep beans crisp

  • Pack them tightly upright so they can’t float.

  • Keep everything under brine (use a weight or a trimmed cabbage leaf + small weight).

  • Ferment cool (65–72°F) when possible.

Fermentation timeline (typical)

  • Day 1–2: tiny bubbles, brine clouds slightly.

  • Day 3–5: flavor brightens; start tasting daily.

  • Day 5–10: done when beans are tangy to your liking and still crisp.

  • Move to fridge to slow fermentation and hold crunch (lasts months).

Troubleshooting

  • White film (kahm yeast): harmless. Skim, taste; if flavor is good, keep going.

  • Soft/slimy beans: too warm or not fully submerged. Next time, ferment cooler and pack tighter.

  • Off/rotten smell, fuzzy colors (pink/black/blue): discard and start over.

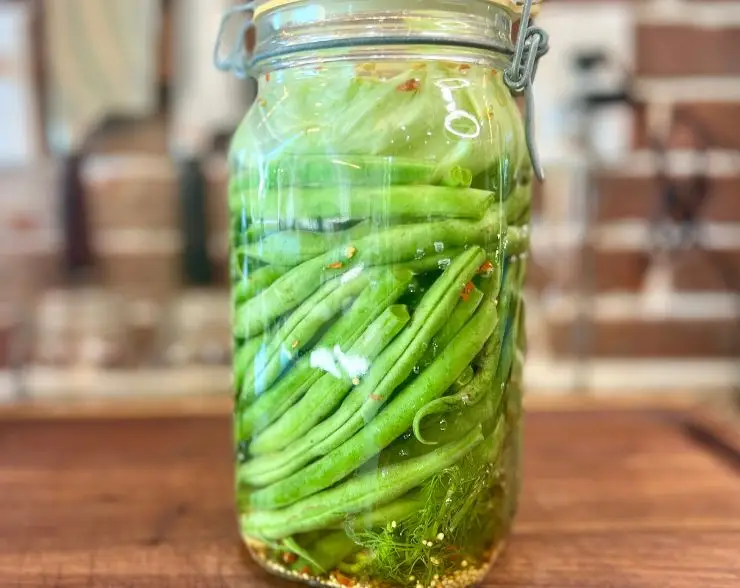
Fermented Green Beans (Dilly Beans)

Crisp, garlicky, and tangy, these fermented green beans—also called dilly beans—are packed in a simple salt brine with dill, garlic, mustard seeds, and peppercorns. In just 5–10 days, they develop a refreshing bite and probiotic boost, staying crunchy for months in the fridge without any vinegar or canning.
Prep Time 10 minutes
Fermentation Time 10 days
Servings 1 quart

Ingredients
  

  • 1 pound (450 g) fresh green beans, ends trimmed
  • 2-4 garlic cloves, smashed (optional)
  • 2-5 dill sprigs or 1–2 tsp dill seed (optional)
  • 1 tsp mustard seeds (optional)
  • 1 tsp black peppercorns (optional)
  • 1/2-1 tsp red pepper flakes (optional, for heat)

2% Brine

  • Scale method: 500 g water + 10 g fine sea salt (or enough to cover your packed jar)
  • No-scale quick measure (approx. 2%): 2 tsp fine salt per 2 cups water

Instructions
 

  • Make the brine: Dissolve salt in room-temp filtered water. Set aside while you prep the jar.
    Prep jar: Clean a 1-quart jar. Add garlic, dill, mustard seeds, peppercorns, and red pepper flakes to the bottom.
    Pack beans: Stand beans upright, tightly. Trim lengths so they sit just below the shoulder of the jar.
    Fill & submerge: Pour brine over beans to cover by at least ½ inch. Add a fermentation weight (or a folded cabbage leaf + small glass weight). Everything must stay below brine.
    Lid: Use an airlock lid, or a regular lid set finger-tight (not cranked down) so CO₂ can escape.
    Ferment: Place on a plate at cool room temp out of direct sun. Burp if using a regular lid (open/close daily for first 2–3 days).
    Taste: Start at Day 3–4. When pleasantly tangy with a crisp bite (usually Day 5–10), refrigerate.
    Serve & store: Keep beans submerged in the fridge. Best within 3–4 months, but often fine longer if clean and submerged.
Tried this recipe?Let us know how it was!