
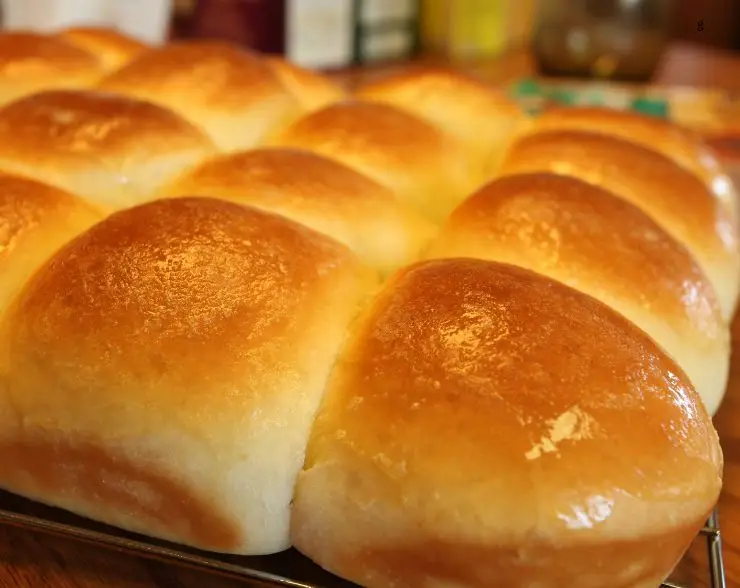
Homemade Dinner Rolls
Soft, warm, and buttery dinner rolls made with simple ingredients. These bake up fluffy and tender, perfect for everyday meals or special gatherings. No special equipment needed — just a bowl, your hands, and a little time to rise.
Ingredients
- 1 cup warm milk (110°F — warm like bathwater)
- 3 tbsp pure cane sugar or honey
- 2¼ tsp active dry yeast (1 packet)
- 4 tbsp salted butter, melted,
- 1-2 tbsp melted butter for brushing
- 1 large egg, at room temperature
- 1 tsp kosher salt
- 3-3½ cups unbleached all-purpose flour
- Olive or avocado oil, for coating the bowl and baking dish
Instructions
Step 1: Activate the Yeast
- Warm the milk until it feels like comfortable warm bath water (110°F).Pour into a large mixing bowl.Add the sugar (or honey) and whisk to dissolve.Sprinkle the yeast evenly on top. Do not stir.Let stand 5–8 minutes, until creamy and foamy.Foam means the yeast is active and ready. If no foam appears, start over.
Step 2: Mix the Dough
- Stir in the melted butter and room-temperature egg.Add 1 cup of flour and the salt. Mix to combine.Add more flour one cup at a time, stirring between additions, until a soft dough forms (about 3 cups total).Dough Texture Check:The dough should be soft and slightly tacky, but not wet or gluey.If it sticks heavily: add flour 1 tablespoon at a time.If stiff or dry: add 1 tablespoon milk to loosen.
Step 3: Knead
- Lightly flour a clean surface or your countertop.Turn the dough out onto the floured surface.Knead the dough by hand for about 8-10 minutes, or use a stand mixer with a dough hook for about 6-7 minutes. The dough should be smooth and elastic—not sticky.If the dough is too sticky, sprinkle in a little more flour, a tablespoon at a time, but don’t add too much or the rolls will be dense.By Mixer:Use dough hook on medium-low 6–7 minutes, until the same smooth, elastic stage is reached.
Step 4: First Rise
- Lightly oil a clean bowl with olive or avocado oil.Place dough in the bowl and turn it once so the entire surface is lightly coated.Cover with a clean towel.Let rise about 1 hour, or until doubled in size.If you gently press with a fingertip, the indentation should remain.
Step 5: Shape the Rolls
- Punch down the risen dough gently to release the air.Turn the dough onto a lightly floured surface again.Divide the dough into 12-16 equal pieces, depending on how large you want the rolls.Shape each piece into a smooth round ball by pulling the edges under and pinching the seam at the bottom.Place the rolls on a oiled baking sheet or in a greased round cake pan, spaced about 1 inch apart.
Step 6: Second Rise
- Butter or oil a 9×13 baking dish.Arrange rolls so they are just touching.Cover and let rise 25–35 minutes, until puffy and rounded.
Step 7: Bake
- Preheat oven to 375°F.Bake 15–18 minutes, until the tops are light golden brown.
Step 8: Finish
- Brush warm rolls with the remaining melted butter.Optional: Sprinkle lightly with flaky salt.
Make-Ahead Options
- OptionHowOvernightShape rolls, place in pan, cover tightly, refrigerate. Next day, let sit 45–60 minutes at room temp, then bake.Freeze (Baked)Cool rolls completely, wrap well, freeze up to 2 months. Rewarm at 300°F for 8–10 minutes.
Success Keys
- Foam in Step 1 = yeast is working.Soft dough = soft rolls. Don’t pack in flour.Rising times vary — watch the dough, not the clock.Smooth tops come from pull-and-tuck shaping, not squishing.
Make-Ahead Option: Freeze Before Baking
- After Step 5 (Shaping the Rolls):Place the shaped rolls on a baking sheet so they aren’t touching.Freeze uncovered for about 1–2 hours, until firm.Transfer the frozen rolls to a freezer bag or airtight container.Freeze up to 2 months.To Bake Later:Place frozen rolls into a buttered or oiled baking dish.Cover with a clean towel or plastic wrap.Let thaw and rise at room temperature for 1½–2½ hours,or until soft, puffy, and noticeably larger.Bake at 375°F for 15–18 minutes, as usual.Key Visual Cue:They should look puffy and rounded, not dense, before baking.If they still look like cold dough balls — they’re not ready yet.
Tried this recipe?Let us know how it was!